As I stated in the previous blog, I’ve been working on a different approach for face rigs. For Manny here I did a lot of different stuff compared to last time. I have better deformation in the lips, eyes and eyebrows, but i noticed i encountered some issues with expressiveness. Overall i liked how it turned out, the mustaches are much more stable now, i made some interesting offsets around the mouth, nose and squint controls. I think, remaking this facial rig made me learn a lot of stuff, and made me come up with different approaches and different ways to do certain things.
This right here is my new and current joint setup for the face.
This time around i made a double ribbon set up in the mouth due to difference in topology between the upper lip and lower lip. I made the ribbon setup in the brow more stable as well as in the eyes. And i made a ribbon setup in the squint area for better smoothing.
In the mustache, the rig is basically the same but not the way i integrated it with the rest of the face. In the previous version i used constraints to maintain the mustaches relative to the head and the lip movements. It worked well sometimes, but there were times the mustaches flipped out of nowhere and it made that part of the rig break. This time, instead i placed a follicle on each side of the face and placed the mustache rig underneath it. Now it was more simpler and more stable than before.
The Mouth:
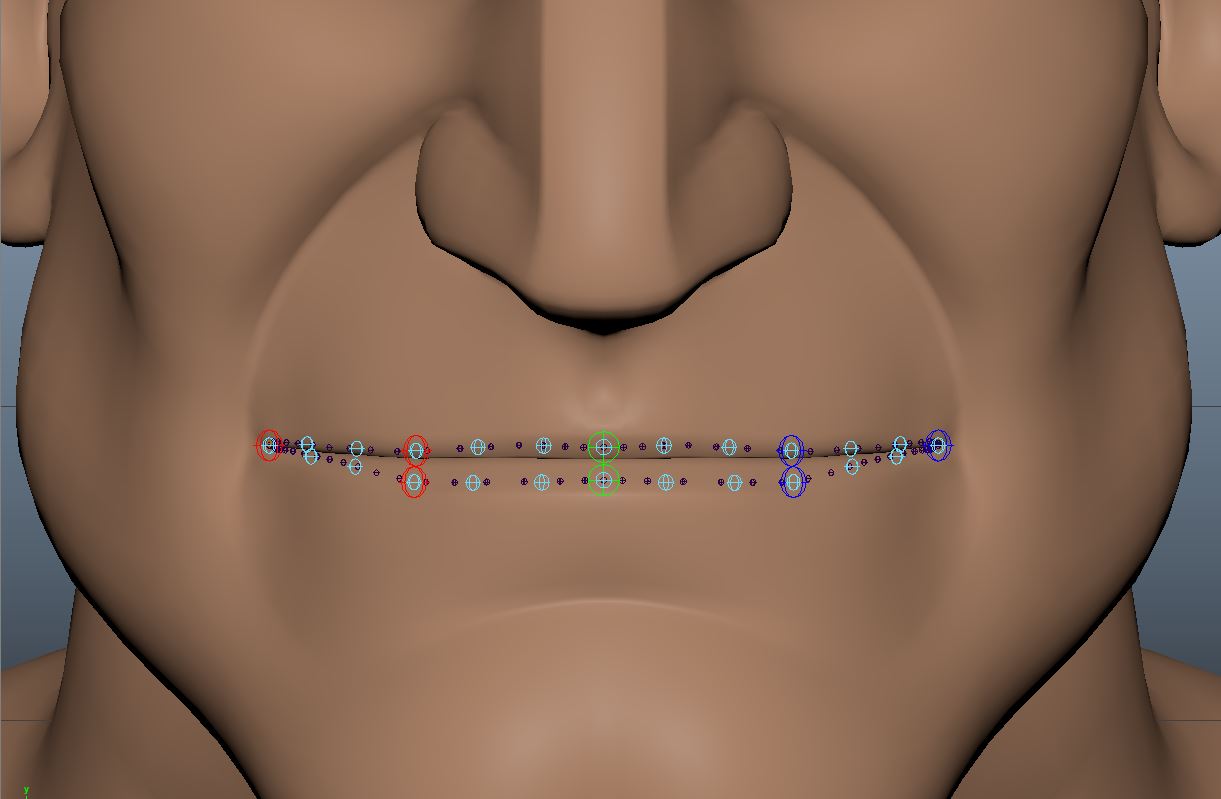
In the mouth set up, as you see above, the small dark blue joints you see here, i placed them on each vertex on a loop that goes around the lips. I do this because the topology of the upper lip and lower lip are not matching perfectly, so if i want to do some deformation on the top and the bottom that looks the same i wont have it with mismatched topology. So i proceded to do this. Once set up, i created a curve for the upper and lower lip and made a loft with follicles and point constrained the joints and the follicles so that the ribbon moved the mouth. After that i painted the joints at full influence cause there was no space for smoothing between joints.
Then, i created a new row of joints above those ones, which are going to be skinned to the first loft/ribbon setup. But this time, i placed the joints where i could get the most appeal for the deformation regardless of topology, which are represented here as the light blue joints. I then proceded to create another curve on those new joints and created a new ribbon setup, but instead of point constraining the joints and the follicles, I parented them directly so that they also rotate with the moment of the ribbon, but since the skin joints are point constrained, the rotation of the first ribbon joints wont affect the mesh badly and do weird rotations and stretching. Instead, it creates these really nice curves in the lips.
After that setup i just created the bigger joints and skinned them to the second ribbon and connected the whole thing.
In the corner of the mouth i created this locators to act as offsets so that when the mouth opens, the movement and deformation of the lips looks more natural and organic compared to what i had previously, it looked rigid and odd.
On the next blog post i will talk about how i did the eyebrows differently from the first time.
Thanks for reading!


