jen Project Pipeline - Lets talk about project folders and code by Jose Espinosa

So, one thing that you might be wondering is how do i handle the working files remotely without any lost paths or anything and make it seamless. Well thats what i want to talk about today!

Basically, the way im handling the organization of the project is that i made an organized directory in the FTP server, where all the files and information are neatly stored and organized. The way that the tool does not get lost in knowing where the files are regardless of the computer its being ran on, (remembering the previous blog post that mentioned the use of local files pulled from the FTP) is that i am basically reading that directory from the FTP and im pulling it to be saved locally with the same organization. So when the files are pulled, lets say you pull the model from a character named “John”, it will pull from the server to local like this:

Server: //Project/2 Production/Characters/John/Model/publish

Local: C:/Users/user/Documents/Project/2 Production/Characters/John/Model/publish

So when opening referenced files or just handling textures, in reality nothing really changes because its organized the same way in the FTP and in everyone’s personal computers.

The way im handling the pull of those directories is with some cool python coding and using the FTP module for python, which lets me query folder names and files just like the OS module lets me do the same in windows.

import os
import ftplib
import sys

#Ftp log in
    
session = ftplib.FTP('FTPAddress','Username','Password')

#project path
path = 'Project'

#empty path list to store the full directory
pathList = []

#list directory of the main path
pathList.append(path + '/')

Starting simple im just importing the os, ftp and sys modules for use. Im initiating a new log in session through the FTP, so that i can pull the info i want, im declaring my project name. Im doing it this way, because i could easily change the project name and the code still works if i wanna switch to an new project. Then i have an empty list called pathList and then im appending the main path to that list, which in this case is ‘Project/’, since FTP doesnt have any drive string preceding it, its just written as it is.

#function to cycle all directories
def cycle(directory):
    mainD = session.nlst(directory)
    for a in range(0, len(mainD)):
        if mainD[a] in pathList:
            pass
        else:
            pathList.append(mainD[a])

Then i continued by creating this function, which i can just add the directory, hence the pathList variable, and i can cycle through each folder and list its contents down the line. Thanks to the mainD variable, which session.nlist() its like an equivalent of OS’s os.listdir(). VERY CONVENIENT

def folderCreate(folderPath):
        doc = os.path.expanduser('~/')
        
        fullpath = doc + folderPath
        if os.path.exists(fullpath):
            print '---' + folderPath + '---Folder Already Exists'
        else:
            if folderPath.endswith('.txt', '.ma', '.mb', 
                                    '.png', '.jpg', '.mov', 
                                    '.mp4', '.jpeg', '.py', 
                                    '.pyc', '.tiff', '.iff', 
                                    '.json'):
                pass
            else:
                os.mkdir(fullpath)
                print '---'+ folderPath +'--- Folder Has Been Pulled from Server'
                

Now this is like, the heart of it all, here i basically i am taking advantage of the os.path.expanduser so that i can query the documents folder regardless of username and pc owner, so i can create my local directory. Then im just running a check that detects if the folder im trying to create exists, and if the file that im doing a query to, is a working file, like .ma or .mb which im going to use a lot in this project. Then, based on what i pulled from the FTP im creating that same directory with the os.mkdir command.

#run function with main path

for i in range(0, 500):
    try:
        cycle(pathList[i])
        print ('Directory Level ' + str(i + 1) + ' Done')
    except IndexError:
        break

for i in range(0, len(pathList)):
    folderCreate(pathList[i])

#log off from ftp
session.quit()

And finally, this is where it all comes together, Im basically doing a 500 for loop that is just using try and except so it doesnt do the 500 check everytime. That way i dont have to specify how many folders i have in the directory, and i just have a big number so i can keep adding folders to the FTP directory and it will pull it successfully. So im just cycling the cycle function and then based on the pathList variable im looping the creation of the folders. And finishing off with of course, logging off from the FTP itself.

I just saved this file separately so i can call it on command via the Maya script editor or, from the UI itself. For example, in the UI, i added a menu button to update directory, which it calls this code and checks the folders.

jenPM_3.jpg

And this is how im handling the organization of the whole project itself, so that everyone is on the same page, and we dont have to transfer stuff via wetransfer or dropbox or anything, its all inside Maya. I’ll go more in detail on other aspects later on!

Cheers!

jen Project Pipeline - A journey within a journey by Jose Espinosa

Hello! Sorry i havent posted in a while, things have been pretty busy as of my last blog post. But! Updates! Between then and now, i started a new job in Vancouver as a Senior Rigger and so far it has been a blast!

Anyways to start, with the content of this blog post… a little backstory. I wrote a story for an animated short film im working on in my free time. It has been a long process and theres still lots to do, our team is very small so i have to do a lot of work and develop a lot of stuff to get this short to completion. Hopefully when this project is done, it can begin my journey as a director. (One can hope) Ive had experience running projects in the past, mainly in the areas of organization, pipeline stuff, task management and overall running the a project from start to finish, so im bringing that knowledge for this personal project.

While we started working on this project and the pre production began, i started thinking ahead, since im mostly used to that thinking, i was trying to anticipate any problems we could face during production, one of those problems is the management of assets across the artists. There are many tools out there that can make this easier, like Artella, or Shotgun or any other project management software/asset management. Because one option was, to transfer the info between us via Dropbox or g drive or things like that, but its too much hassle. So i began to think, what if i make like, something like Artella but, by myself? Since Python is pretty much compatible with a LOT of stuff. I started doing my research.

I stumbled upon FTP servers, and what do you know, theres a whole python module for FTP servers. So I mixed that with some python and some Maya commands and i started to develop what i named… jenProjectPipeline. A tool that, in the course of this project, will facilitate the use of assets, props, characters, rigs, textures and animations of the whole short film. This tool is still in development of course, i believe i have done a lot of work on it in the past few months, so i think ive made good progress and ive made some successful test runs.

Here im gonna start breaking down my logistics with the UI, maybe in future blog posts i can go a bit in detail on parts of the code.

jenPM_1.JPG

Here, we can see what i have so far in the UI, we can see the different sections in tabs for modeling, rigging and animation. So now ill explain how it works.

jenPM_2.JPG

Here in the section labeled as number 1 in red, is a text list of all the files/items in the server that are under assets. As you can imagine, each type of model, rig an animation tab has the same server list layout in the UI. The purpose of this section is so that the user can see the list of all the available assets(in this case) that are currently in the FTP server. It also tells them what is the latest file currently in the FTP as well, for example in this image. We can see that the Tree asset is still in its first version, versus the Cliff asset is already in its third version. But with that list alone, we cannot handle those files to be worked on. Therefore, below the list, theres a progress bar with a download button. What this does is, when you select the asset you want to work on, you can hit the download to pull that file from the FTP server and store it locally on your computer. Once its fully downloaded, it will appear in the UI as a usable/editable asset.

That takes us to the area labeled number 2 in blue. That area is an icon text button layout that will display all the files you currently have locally with an icon representing them visually. It will also tell you what version you currently have locally. That way, if you are a version behind, you can download from the FTP and get the latest, but still storing the previous versions if you want to roll back. Having those assets locally in the right side opens us up to other options in the UI, marked below as number 3 in green.

These buttons below will allow us to manage what we want to do with the asset we selected in the number 2 area where the local files are stored. Starting with the green buttons, we can do a normal save, its just like a CTRL + S. Then we have Save Version, which is just that, version saving for your working backups. And with the publish button, what this does is that, it saves the official file, as a published file or published asset, and stores it locally, making the UI update on the right, but also, it triggers a python FTP code to upload that published asset back to the FTP server so that other users may see it and download it as well. This is going to be huge and very handy when handling the model deliveries, like, they can just tell me, i finished this character and i published it, and now i know i can just open this tool, download said character and start working on it. Since all of my small team is working remotely, this is going to be crucial to maintain a good synchronization during production.

The orange buttons, Open is just opening the selected file, Open Version is if you want to open any backup versions you saved with the Save Version button and the Open publish version is the same thing, but with the published files.

And finally in blue, we got the referencing, pretty straightforward, Reference its just that, it takes the latest asset selected and does a reference. Update Reference checks your scene for the asset selected in area number 2, and checks if its already referenced and it prompts you if you want to update that selected asset to the latest, or if you want to choose to what remap that asset. And finally, Reference publish version is if you want to bring a new reference that you can look for from the publish files.

I feel it pretty straight forward, im really excited how its working and how it has turned out, in the tests ive made, one of the team members actually uploaded that Cliff asset and i successfully downloaded it on my pc via the tool.

This is a pretty cool start for this tool and i bet its going to be very helpful in this project. Im going to continue developing it, and i will do my best to keep this blog update with the development of the tool and i will talk more in depth about certain areas of the tool as well. Maybe i will also do tech blogs talking about the rigging progress for the main character as well, well see!

Thanks for reading!

Manny Rig - Mouth Setup by Jose Espinosa

As I stated in the previous blog, I’ve been working on a different approach for face rigs. For Manny here I did a lot of different stuff compared to last time. I have better deformation in the lips, eyes and eyebrows, but i noticed i encountered some issues with expressiveness. Overall i liked how it turned out, the mustaches are much more stable now, i made some interesting offsets around the mouth, nose and squint controls. I think, remaking this facial rig made me learn a lot of stuff, and made me come up with different approaches and different ways to do certain things.

This right here is my new and current joint setup for the face.

mannyFaceJointsNew.JPG

This time around i made a double ribbon set up in the mouth due to difference in topology between the upper lip and lower lip. I made the ribbon setup in the brow more stable as well as in the eyes. And i made a ribbon setup in the squint area for better smoothing.

In the mustache, the rig is basically the same but not the way i integrated it with the rest of the face. In the previous version i used constraints to maintain the mustaches relative to the head and the lip movements. It worked well sometimes, but there were times the mustaches flipped out of nowhere and it made that part of the rig break. This time, instead i placed a follicle on each side of the face and placed the mustache rig underneath it. Now it was more simpler and more stable than before.

The Mouth:

mannyMouthJnts.JPG

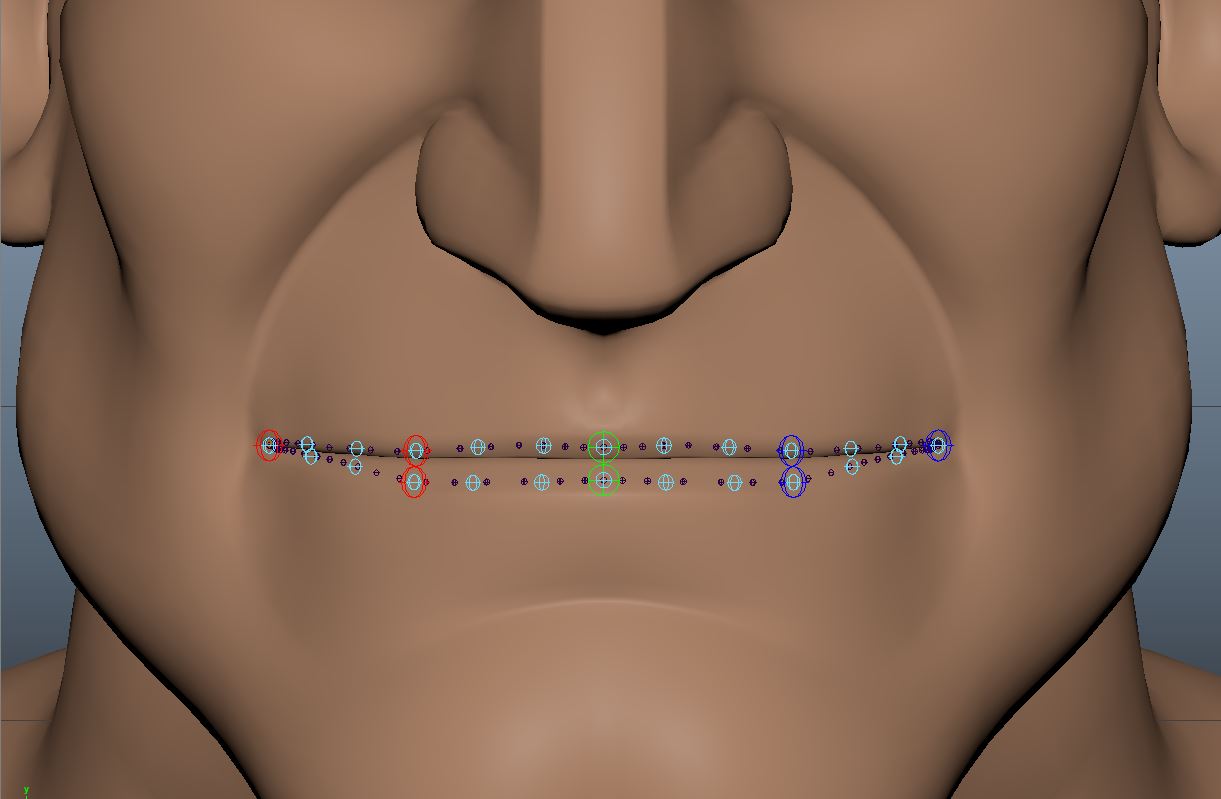
In the mouth set up, as you see above, the small dark blue joints you see here, i placed them on each vertex on a loop that goes around the lips. I do this because the topology of the upper lip and lower lip are not matching perfectly, so if i want to do some deformation on the top and the bottom that looks the same i wont have it with mismatched topology. So i proceded to do this. Once set up, i created a curve for the upper and lower lip and made a loft with follicles and point constrained the joints and the follicles so that the ribbon moved the mouth. After that i painted the joints at full influence cause there was no space for smoothing between joints.

Then, i created a new row of joints above those ones, which are going to be skinned to the first loft/ribbon setup. But this time, i placed the joints where i could get the most appeal for the deformation regardless of topology, which are represented here as the light blue joints. I then proceded to create another curve on those new joints and created a new ribbon setup, but instead of point constraining the joints and the follicles, I parented them directly so that they also rotate with the moment of the ribbon, but since the skin joints are point constrained, the rotation of the first ribbon joints wont affect the mesh badly and do weird rotations and stretching. Instead, it creates these really nice curves in the lips.

After that setup i just created the bigger joints and skinned them to the second ribbon and connected the whole thing.

MannyMouthCornerOff.gif

In the corner of the mouth i created this locators to act as offsets so that when the mouth opens, the movement and deformation of the lips looks more natural and organic compared to what i had previously, it looked rigid and odd.

On the next blog post i will talk about how i did the eyebrows differently from the first time.

Thanks for reading!

Revisiting Manny - The Re-joruney? by Jose Espinosa

So I came back from Siggraph a couple of months ago and dove straight into an intense crunch time where I work, so I havent had much time to work on some of my stuff but now I seem to have a bit of more time on my hands.

While I went to Siggraph I had the opportunity to talk to some amazing people from the industry, got a lot of feedback for my reel and Manny and all that.

Now that I am back home, I can tackle those feedbacks and fix some stuff that, when told about made sense to me, and I still want to improve and make my stuff better.

One of the things from the feedback was the facial rig, and it was also something I was experimenting with before leaving to Vancouver.

Heres my current setup for the facial rig… It is functional, it works, but I believe I can push it further to get more appeal, more range of motion and overall better performance not just for the animators, but for the aesthetics of the character per se.

ManyFaceAnim.gif

This is my current joint setup, and again, it works but i would like to add more life to it, so I’m basically going to erase his face rig and rebuild it from the ground up.

mannyFaceJoints.JPG

So in this setup I mainly focused on curve based ribbon setups. Using the point on curve info node to connect my skin joints to a curve, then driving that curve with other joins so i can have a nice falloff in the facial motion. I used this setup for basically the entire thing, mouth, eyes, eyebrows. In the eyebrows i was mostly experimenting with that curve using ik handles for each joint, basically, the joints are in a sufficient distance so that, when you move the controls and the ik starts to behave and move the joints, they move along the surface of his forehead/skull, giving the illusion of when you move your eyebrows and your skin slides on your forehead and slides on the top part of your eye sockets. It is a very cool effect i managed to accomplish with this setup, but im thinking i can achieve the same thing without all the weight of the whole facal rig.

So this is my new plan… roughly. So the blue balls are going to be roughly my skin joints and the red ones are going to be my driver joints that are going to drive the facial setup. My approach this time is to position the joints where aesthetically and design wise makes sense instead on just placing them raw on certain vertices or edges in the polyflow of the character. I have done some several trials of this approach at work with good success so far. SOOOOOO i am going to test that approach with my buddy Manny over here. I also want to do better skinning on his facial rig, i want to make it look UNFFF sooooo gooooood. Tho my challenge right now is that, the mouth is a bit too pre posed for my liking but…. I’ll roll with it to see what happens! I’ll keep posting progress of this adventure of fixing Manny’s facial rig!

PS: Im doing a fundraiser to raise money for tools and equipment for those aspiring young artists that want to get into the animation industry here in Puerto Rico. If you want to learn more, theres a button below that will take you to the gofundme campaign.


Manny Rig - The origins by Jose Espinosa

Manny Rig is a personal project ive been working for a while now in my free time. Eventually it will be a rig that will be sold online with a bunch of features. Right now, my free time consists on weekends and whenever i get home from my 9-6 day job and have enough energy to work on him. 

For me it has been a somewhat slow process. Also the passing of Hurricane Maria was a really tough blow on my professional and personal life here in the island. It was hard to work on a rig without having electricity for 6 months and just struggling to get basic necessities. But I managed to find ways to at least work on him a bit and nevertheless, have learned a whole bunch working him. 

The original idea and design of the character is from my friend Christian Berrios, who also modeled the character. Very talented fellow, glad to be able to work with him! He envisioned This muscular wrestler, a la old style with the handlebar mustache and i thought it was a really cool idea. We have some further ideas with the character in terms of additional outfits. 

One of our ideas is making him a super hero suit, and a hairstyle similar to a Clark Kent style. First sketches and sculpt tests of the idea look super cool! We still have some other ideas about outfits for him, like an army/soldier outfit and stuff around that area but nothing is set in stone yet. 

Later on i will be writing about my technical approach on how i did his hand posing system in maya. Right now, i need to keep preparing for my trip to Vancouver! Siggraph 2018!

Welcome to my Blog! by Jose Espinosa

Hello guys! Welcome to my blog!

I will be posting here some of my research that i do on my free time and maybe some stuff about animation and movies and all sorts of stuff! Ill keep you guys posted!